Showing posts with label DIY. Show all posts

My weekend in Instagrams

3.11.2013

 photo separator.jpg


The last couple of days I've spent..

lots of time at the dance studio,
an afternoon at a craft fair (where I got that beaded flower ring, hand painted mug and two vintage spoon rings),
a couple hours behind the sewing machine customizing a favorite sweater of mine,
an evening movie-watching with the family (& Amber Kitty),
and some time experimenting with the panorama camera while enjoying the sunset.

Hope you all had lovely weekends. This spring weather has got me feeling very hopeful and energized!


Weekend project

2.25.2013

 photo separator.jpg
 
This weekend I found some time to do a little crafting. I've seen this idea floating around the internet for a while now and when an empty afternoon came about, it was the perfect time to get started on the million and one hangers I have. And I only did three..

It's super easy and a great use for scrap fabric. Plus these babies look a lot prettier than the mismatch bunch I have right now. Have a DIY that you love or have done recently? Please share!

Happy Monday!

The no-sew pillow cover

9.26.2012

Photobucket
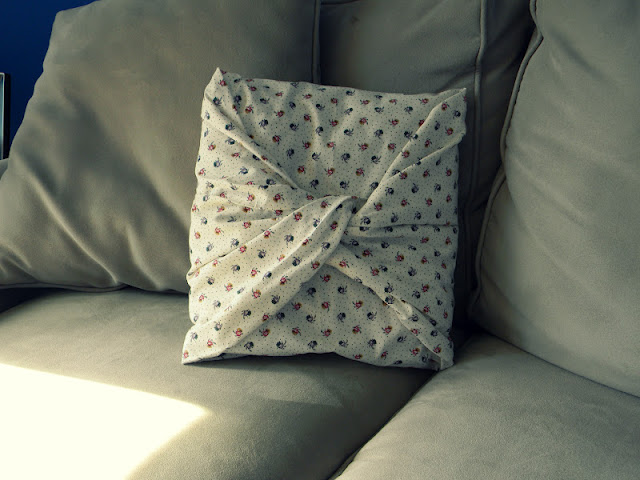
Have you seen this pin floating around pinterest? I love the idea. Don't get me wrong I adore my sweet sewing machine and pretty much find any excuse to use it, but the ease of being able to change up my couch decor is very appealing! All you need is a medium - large piece of fabric (depending on the size of your pillow) and some safety pins (my addition to the original "how-to"). If you can wrap a gift, then you can most certainly do this! And the best part?! You can use that piece of fabric again for something else! What the what?! That's awesome!

1. Lay the fabric down on the floor, pretty side down. Place the pillow in the center and fold two sides into the center of the pillow. They should overlap a bit so that you don't see the pillow.

2. Take the remaining sides and fold them into triangles (exactly like you do for the ends of a gift). Bring them to the center and tie them. Now the above tutorial tells you to knot it and then tuck in the ends but my fabric wasn't long enough to double knot, and a single knot wouldn't stay. So I just tied the ends together once and safety pinned the ends to the underneath so it would stay.
You really can't go wrong with this, so do it however works best for you! Enjoy + make sure you share your no-sew pillow covers with me. I'd really love to see how they turn out!

Have an extraordinary day!

My favorite DIY's (To-do)

9.24.2012

Photobucket
Welp. Welcome to Monday.

You're probably just as thrilled as I am.

So how 'bout you take a second and check out some of these DIY projects!

Some of them look pretty darn easy if you ask me. And they would all make for wonderful gifts, I'm sure.

They've been tucked away in my crafts + DIY ideas board on pinterest for a while now, so here's my motivation. And maybe some for you too. Enjoy!

Scrapbook paper outlet covers, love it. 

Easy Wreath Birdbath by familyfun: Made with a grapevine wreath, a terra cotta saucer and manilla rope. #Birdbath #Kids #familyfun
Hanging twine bird bath

  Fabric-Scraps Bowl
Scrap fabric bowl

  Recycled sweaters! Awesome idea!
Recycled sweater pillows

fabric scrap bracelets
Scrap fabric bracelets & hangers

love this mug! Christmas idea?
Hand painted mugs

What are some of your favorite DIY's. Let me know + maybe I can do a follower's favorite DIY post!
Have a lovely day friends.

In the making mood

5.03.2012

Like there is ever a time when I'm not in a creative//crafty mood. Ha. These are my current must-try's which are also currently on my Someday List. But hey! A girl can dream.. and drool, right?!

Cord Basket -  project here!
 

Driftwood coat rack -  project here!
Driftwood becomes coat rack

Bracelet holder project here!
So smart. 

Bow Belt project here!
 DIY bow belt 

Don't these photos just make you wanna jump up and down and run around looking for the supplies? Cause that's how I feel right about now. Can't wait to try these someday soon! Have a happy Thursday friends. It's almost Friday. And if you need a quick pick-me-up, I've got that right here for ya'! You're welcome!


our home: decorated!

12.01.2011

In case you didn't notice the date above.. it's December 1st. Which means it's acceptable to share our wonderfully decorated, (and mostly DIY) Holiday Home. Technically we put the tree up in November, but it seems like we aren't the only ones decorating before December. I saw an awful lot of trees being carried home over the weekend and lots of homes dressed in bright lights, so I don't feel too terrible about rushing into the Christmas season.

This is our first Christmas in the new home. We thought long and hard about where to put our tree and whether we were going to get a real one or a fake one. Our living room is a little awkward, so it was hard for us to picture where we could fit a real tree without it being in the way. My entire life I have always had a real Christmas tree, so I was a little reluctant to go the fake route. However, we have a wonderful bay window that just screams, "put a little Christmas tree here!" And as for the Christmas tree smell that boyfriend and I love so much -- evergreen candle to the rescue! And plus.. no clean up or watering for us!


The runner and the stockings were my DIY projects for the week. I was so proud of myself. My mom has bins and bins full of fabric, so I was thrilled to find some Christmas prints buried in the piles. I helped myself and viola! I'm thinking about adding some lace on the edges of the runners to give it a little more pizazz.

And of course, you probably noticed the disco balls on our tree. Silly I know, but I had to do it for my lovely DJ boyfriend. That way he'll let me put ballerina ornaments on the tree! Have you put up decorations yet? Some people think it's too early. But clearly, I don't. Happy December!

ShareThis